Category Archives: Holidays

Hershey Bar Reindeer

6th December 2018

I saw a few of these guys on Pinterest (iheartartsncrafts.com) and decided it would be the perfect Christmas treat for my Hershey lovin’ daughter’s preschool class.  I got all of the candy bars and candy canes from Aldi for really cheap and the pom noses and googly eyes from Hobby Lobby for 50 percent off.  So basically, I am like a money ninja. And don’t you love the eye-lashed googlies for the girls in her class?  I can’t hear what you said, but I feel like you said you loved them.

I used hot glue to attach all of the pieces to the candy bar and surprisingly, they didn’t melt the candy.  It is like Hershey witchcraft.  I gave each glue blob a little blow before I attached them so maybe that helped.  

Pin, share, enjoy! 

Baby Elf On the Shelf

2nd December 2018


Who needs an idea for their Elf on the Shelf?  Who wants to expand their elf fam by one precious little munchkin of an elf?  ME too so I made these baby elf by starting with a doll key chain and yes, you can buy one from me!  CONTACT ME VIA HER PARTY PANTS.COM ON FACEBOOK TO DO SO, not my email or comments. They are 8 buckaroos each, plus a few bucks shipping if you aren’t local.

Now, that business is out of the way….let’s get jolly.  Last year our elf, Ninny Muggins, got married to this hot chick, Peppermint.  There was a wedding and all.  I started thinking that SURELY there had to be baby elves for Elf on the Shelf but, no such luck.  After looking for a million years for little dolls to make my own, I stumbled upon key chains that were dolls (for some weird reason) and after a little demo and cutting my own felt patterns, a little glue, baby elves were born everywhere!

Tell me these aren’t precious and that my kids aren’t going to flip out in the morning?!

Reasons you need a baby elf:

Your elf story line has gotten boring.

You are out of inventive elf ideas and this one requires you to simply put it with your elf and let sheer joy come over your kids!  It could be a baby brother/sister to your elf, daughter/son, cousin….who cares.  It’s a baby and everyone needs a baby to love.

Maybe your family is about to welcome a new baby to your family and your elf wants to get in on the action.

Maybe there were too many elves born at the North Pole and the nursery became too full so this baby was shipped to your elf to be cared for this Christmas season.  Elves can happen to anyone at any moment for any reason.

He’s got his momma’s eyes and his Daddy ain’t tryin’ to participate in all this photography.  I don’t say much though because he’s in cahoots with Santa.

Pin, Share, Enjoy and follow me on Instagram and Facebook!  Merry Christmas and I love you, I love you, I love youuuuuuuuu!

DIY Tornado Costume

30th October 2018


It’s here!  This year’s Halloween costume that I made for my baby boy.  He is my first boy after 3 girls and I savor the differences.  One of those differences being that, he reminds me of a tornado, lol.  He is so busy and my first busy child, but at the same time, he’s so easy!

This cost me about 15 dollars but there are lots of ways to make it cheaper!  For starters, I purchased a medium sized bag of batting for the tornado itself and I could’ve just gotten a small one in hindsight.  You can also use what clothes you already have, but I bought a black shirt and pants for him from Walmart for 8-ish bucks total.  All of the goodies hot glued to him are from my daughter’s dollhouse accessory collection and few random things around the house.  Aww yeah gurrllllll, being resourceful!

To get the look, I bought a plastic embroidery hoop and took out the smaller center ring and hot glued it to the top of the shoulders. Then I took batting and glued it  and folded it down around the ring creating top of of the tornado.  That step left a cylinder of batting hanging down around the shirt so I cut arm holes and pulled the sleeves through and glued and cut off any excess needed. I sort of bloused the bottom of it and glued it secure to make a fully, swirly look. Then I took big folds of batting and hot glued it around the shirt in a circular motion.  When that was done, I misted the batting with gray spray paint to give it that cloudy look.

For the pants, I laid a square piece of batting over the pants and trimmed it to size, cutting a swirl down as I got to the ankle, getting smaller as I went.  I did this for both sides.  Then, just hot glue a bunch of crap on it and you’re done!  I bought a paper mache birdhouse and cut in half and used the backside to paint and make look a home.  You could also use a Christmas ornament of a house or building and cut the string off.   I’m scrambling to get this post up so please find her party pants.com on Facebook (<<<it appears just like that)  and message me for a fast response!  Thanks for looking and Happy Halloween!

Pin, share, enjoy!

DIY Gingerbread Man Costume

29th October 2018


** Originally on my site that is no longer available, the1sthundred.com**

If it looks familiar to my readers from years past or if you’ve seen this same outfit on Pinterest, it’s still me.  I never got great pictures of this outfit when I made if for my daughter a few years ago when the Halloween weather was a nightmare! As luck would have it, I saved the outfit and now it fits my son.  I smiled and laughed watching him in our yard in this costume because, how can you not love it!

I made this outfit for UNDER 10 DOLLARS with only a Walmart top and pants and a few pieces of felt, ric-rac, ribbon, and hot glue.  It wasn’t hard at all!  I put the brown top and pants on my daughter and marked where the vest should fall and then I laid it out on the floor and started gluing!  I cut one side of the vest and trimmed it until it was just right and then used it as the template for the other side of the vest so they would match.The vest is only on the front side, FYI.  I started the ric-rac on the pants right where the vest hit and glued it all there on the floor all laid out together  so that the lines matched up and flowed.  The bow tie is just some Christmas ribbon I had and I just tied it and glued that baby on!  This is the cutest, right?  I’m glad I finally got some pictures to do it justice.

HAPPY HALLOWEEN errr…Christmas or….Merry Halloween time!  My son’s actual costume for this year is to come!

Pin, share, enjoy!


He called these “football pants”.  You know, because they sort of look like footballs.  It made him real amped to wear them either way.


Party Animal Costume

28th October 2018


Last minute, 5 minutes or less, 5 dollars or less!  My daughter was invited to a Halloween party where they said to come dressed as their favorite zoo animal. Of course having so much party in my pants I had to do something creative and add a twist. I threw together what I had around the house, plus a few dollar store items and put this together 30 minutes before the party, dressed, face painted, photos taken and all.  This is the PERFECT LAST MINUTE costume!

Find any animal patterned clothes or solid color clothes that your kid already has.  Add a few animal details (whiskers, stripes, dots, noses) with make-up or face paint, if you have some.  Add a party hat ( we used one from a party the day before), get some party blowers and a balloon from the dollar store and YOU ARE DONE!  It’s creative and couldn’t be more versatile, fast, resourceful, or cheap!

Here is my last minute Snow Leopard Party Animal.  Note the disco ball necklace.  It was one of my favorite finds at our house that was so theme appropriate!

Pin, share, enjoy!

DIY Christmas Felt Flower Wreath

14th November 2017


I went to Target, like always. I saw stuff in the one spot aisle, like always. I bought it all whether I should have or not, like always. The good news is, as soon as I saw this trim, I saw a wreath in my head! I made all of the flowers myself and added them with the leaf and pom trim from the retail motherland. I put them all together on a branch and twig wreath and there you go! I hope you like it! I have another wreath coming in the next 2 days.  #can’tstopwon’tstop


DIY LOL Surprise Doll Costume

2nd November 2017

*Some affiliate links in this post.

Do you have a child OBSESSED with LOL Surprise Dolls?  Yeah, me too.  Three of them.  My oldest child asked to be an LOL ball for Halloween and a doll coming out of the ball. I love something different so I was on board. They don’t sell that so I got to makin’ one!

Here are the supplies:

Printer

Smooth foam balls spheres 12 inch

Acrylic Paint and Sharpies

Shrink wrap

Hot glue

Ribbon

Sheet of craft foam

Heaband

Face paint or make-up


For those of you who don’t have girls who watch toy videos on YouTube, this is what we were imitating.  We were doing the actual package and the girl she picked.

Depending on the series of the ball, different girls are on different balls so this isn’t the exact one we went with.

Buy the color acrylic craft paint for the color of ball you want and apply it with a sponge brush.  Then get a sheet of white computer paper (it bends easier on the ball), a black Sharpie, and your laptop. This is a hack that I came up with and use anytime I need a logo like I did here with the Playdoh costume.  Google an image, blow it up on the screen to the size you need and trace it with the paper right on your computer screen!  Sometimes you need to turn the lights out so that the image will shine through your paper to be traced.  Color and cut out that bad boy!  I printed out the image of the doll and free-handed the unbox me word bubble.  For the bar code on the back, I traced a greeting card with a Sharpie to make the shape and then used the edge of the card to make straight lines for the bar code itself.  So easy!

Arrange the images on the ball loosely with tape and once you get the right placing, use a hot glue gun to adhere edges to the ball but only in key spots where needed.  You can’t make the image lay perfectly flat without creasing so apply glue dots only where needed.

Once you are happy with your ball layout and it’s all attached, cover both halves in shrink wrap to make it look like the packaging!  I LOVED this detail and thought it made it look realistic AND it protected the paper images.  What??!!!??? Oh yeah, girl. Once you have the ball wrapped, you use a blow dryer and hold it about 3 inches away and make it shrink around the edges.  It is pretty fun to do.  I was like, “What else can I shrink wrap? Hmmmmm….”

Last step in the ball is attaching the ribbon to make it wearable.  You will need 4 strips of ribbon and how long, depends on your child.  You can have someone help you hold the ball half to the front of your child to gage.  Use two strips to connect the 2 halves to sit on the shoulders like a tank top would fit.  (See pics below)  This way they can slide it right over their head easily.  I use hot glue to do this step like most steps because hot glue is a gift from the craft heavens.

To complete the ball, put trips, one on each ball under the arms a bit so that they can be tied together, side to side, to keep the ball in place.  You can see this in the last very sub-par picture of my daughter in her school costume parade.

I DID THIS CHEETAH PRINT BY HAND WITH A SHARPIE BECAUSE I CLEARLY HATE MYSELF!  Don’t do it.  I thought it wouldn’t take that long…hours later with regret and carpal tunnel….I was big time wrong.  I bought a white shirt from Wal-Mart, went to town with the Sharpie, and cut a sleeve off to look like Diva’s bodysuit.  Using pink craft foam, you know the stuff in the kid craft aisles, I cut out a belt shape, drew on the details, and attached it to the shirt with hot glue.  I did the same thing for the foam bow which I glued on a cheap headband.  I added Wal-Mart glitter pants and some black boots and she was as Diva as you can get appropriately for an 8 year old knocking off a weirdly dressed toddler Lol doll.


We came, we saw, we LOLed and her costume was a big hit!  Pin, share and enjoy and follow me on all of my social media accounts using the icons in the right sidebar.  See ya round!

DIY Baby Noah’s Ark Costume

1st November 2017


HOLD up! Baby Noah up in hur’! I was a little torn on whether or not to do this because Noah is well known, but I settled on it because the costume is really uncommon! The whole look was less than 15 bucks and it was easy to do. Just kidding. I sawed off plastic animal heads with a serrated bread knife and, this just in, they aren’t made for cutting hard plastic. Also, it was a DREAM to transport. Also, just kidding. That awesome cloud contraption was a butt-head!

Here is he is and how I did it! Pin me for next year!


NOPE, not a Star Wars character!  Once he was in the ark, there was no mistaking him!  I put him in regular neutral clothes he already had and added a toddler brown t-shirt I cut into a robe, and rope trim from my gift wrapping bucket!  Price of costume:  ZERO dollars.


All of the animals are from Wal-Mart or the dollar store.  You can find these year round so work your Noah whenever you want.  A little hot glue and a black “doorway” colored onto the wood plank poster board and you are super cute and good to go.

The ominous grey cloud and rain!  I made the cloud using the insides of a cheap pillow (cheaper than buying polyfil), 57 cent dowels, spray adhesive and foam board.  I made dowel holes and filed them with hot glue and pushed the dowels slightly through the foam board.  Once the glue was set, I reinforced it with more glue globs.  Next, I cut open a pillow I bought for 2 bucks and some change, sprayed the foam board with spray adhesive and started filling the board with fluff!  It was really fast and anyone can do it.

To make the rain drops, I cut blue felt into drops and attached them to the ends of white rope trim using hot glue and then glued the opposite ends to the foam board. I placed them evenly staggered (oxymoron?) and at varying heights.

Once that was all done, I attached the dowels to the wagon with extra strength clear packing tape and fit them snuggly in next to the seats.  Can I get an amen?  It was actually really sturdy!


To make the wagon look like an ark, I wrapped it in wood plank poster board from Hobby Lobby and cut an ark shape with cardboard and then covered that with the plank poster as well.  Both sides of the ark had different animal heads and I just colored black windows with a Sharpie and hot glued the animal head on that I had cut-off with a knife.  I cut my finger too, right after I burned it with hot glue.  It’s hard being crafty sometimes.

I attached the ark shape board using zip ties on each end, attaching both side around the seats with string.

Pin, Share, Enjoy!

DIY Baby Rapper Halloween Costume

3rd November 2016


1-20161031-img_9804-001


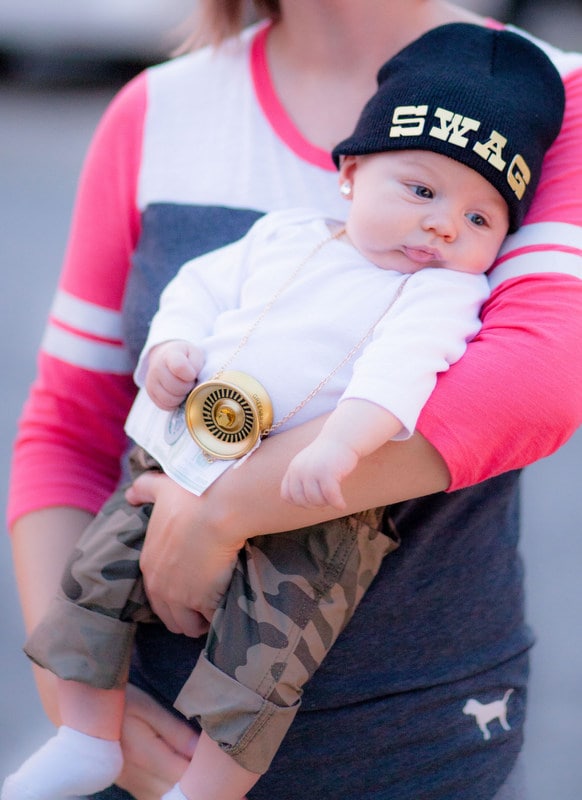
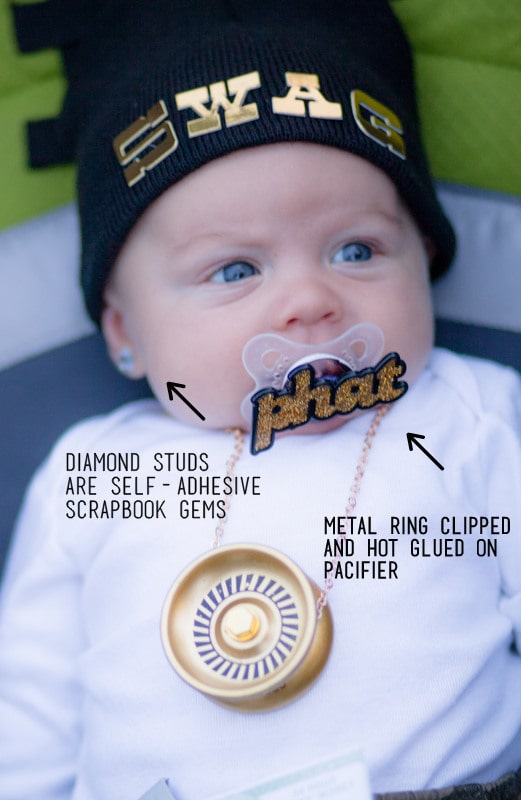
When your awesome idea falls through for a baby costume the day before Halloween, you use another idea and score this doozie for 9 bucks. Thank you, beloved dollar store. This is what my 11 week old wore in the cool 86 degree “fall” weather (har har) and this is what I did.

1-20161031-img_9806

1-20161031-img_9866

1-20161031-img_9879

1-20161031-img_9794

1-20161031-img_9790

Comfortable for him to wear, unique for a baby, easy and cheap!  You DO NOT need to be crafty to nail this one!  I will save my other and much more unique idea for next year so….stand by….or don’t…because it’s a year away. But boy if it weren’t, the suspense would be killing you by now!

Check out past years with my stay at home mom toddler costume, DIY Playdoh, pizza slice, and claw machine costumes in the Holiday/Halloween. I’m on my phone, but I will embed those direct links shortly!

Pin, Share, Enjoy!


DIY Printable Valentines

10th February 2016


I found these two puppies on good ole’ Pinterest.  I picked out the choice pool and let my two girls each pick one out.  LOVE THEM!  One printable is free (gem) and one I bought for 3 dollars on Etsy (donut).  I had my own card stock so it was really affordable!  Aren’t they the sweetest?!


GEM OF A FRIEND {FREE PRINTABLE AT BLOOM DESIGNS ONLINE IN THE SCHOOL SECTION OF PRINTABLES, NOT VALENTINE’S}


1-20160210_133035

1-20160210_133049

Baker’s twine, small clear bags and an assortment of ring pops and you be straight ballin’ on Valentine’s Day.  I used clear little bags from the bead and jewelry aisle at Hobby Lobby and trimmed of the Ziploc top after tying them off.  They come in a cha-jillion a pack.


DONUT I’D DO WITHOUT YOU {ETSY FROM SOS PRINTABLES , $3 INSTANT DOWNLOAD}

1-20160210_132819

1-20160210_132919

Cute, unique DIY printable Valentines that I used for my girl’s this year from good ole’ Pinterest. Links to print included.

Just buy a bag of mini doughnuts and be a blessin’ on this Valentine’s.  We bought both chocolate and powder to use a mix of both.  Are these not making your heart smile?! I adore this instant download and here is the link for a good ANY time of year little donut treat tag to remind someone that you like them tons.

Happy almost Valentine’s Day, y’all!