Category Archives: Halloween

DIY Baby Rapper Halloween Costume

3rd November 2016


1-20161031-img_9804-001


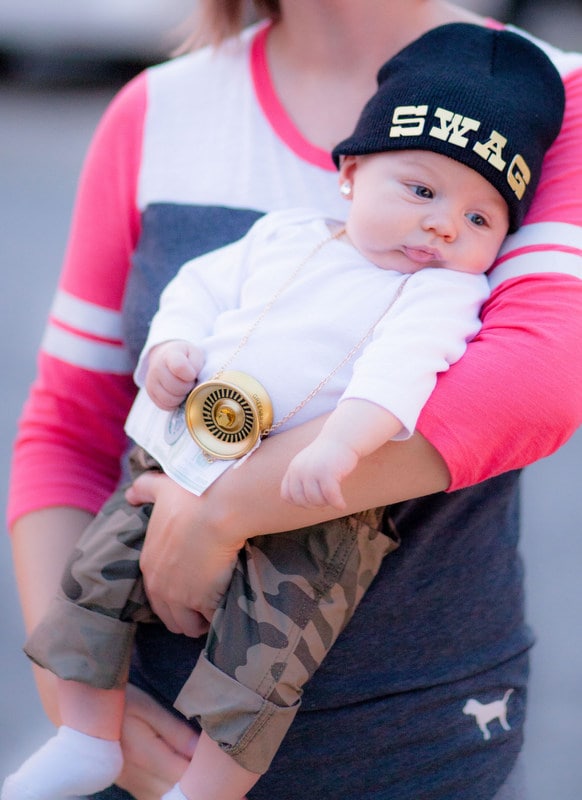
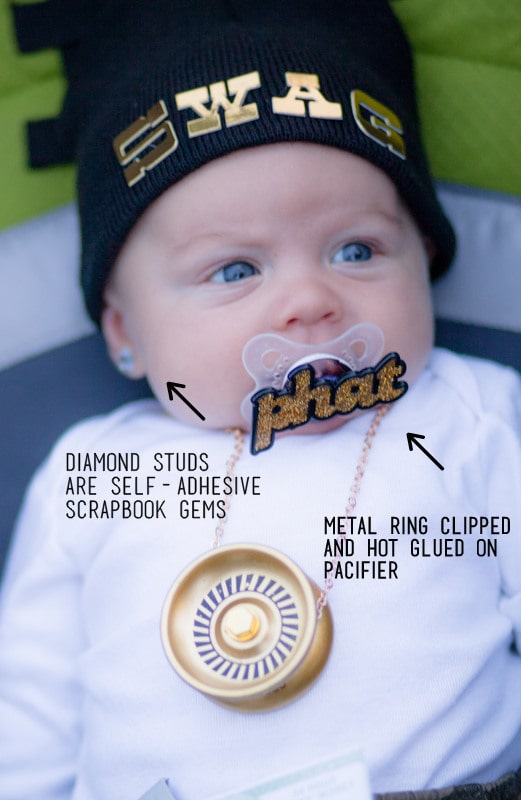
When your awesome idea falls through for a baby costume the day before Halloween, you use another idea and score this doozie for 9 bucks. Thank you, beloved dollar store. This is what my 11 week old wore in the cool 86 degree “fall” weather (har har) and this is what I did.

1-20161031-img_9806

1-20161031-img_9866

1-20161031-img_9879

1-20161031-img_9794

1-20161031-img_9790

Comfortable for him to wear, unique for a baby, easy and cheap!  You DO NOT need to be crafty to nail this one!  I will save my other and much more unique idea for next year so….stand by….or don’t…because it’s a year away. But boy if it weren’t, the suspense would be killing you by now!

Check out past years with my stay at home mom toddler costume, DIY Playdoh, pizza slice, and claw machine costumes in the Holiday/Halloween. I’m on my phone, but I will embed those direct links shortly!

Pin, Share, Enjoy!


DIY Stay-at-Home Mom Costume {For Kids}

2nd November 2015


Drum rolllllllllllllll….tah dah! This year I made my 16 month old a stay-at-home mom! I used everything I had here at home, excluding a small amount of fabric I bought for another costume. That means free, y’all!  And please, no one get their panties in a wad over this “interpretation”.  I am, in fact, a stay-at-home mom.  I also, in fact, look like a mess a lot.  Pajamas just feel so fine….   However, I don’t hot glue pretzels to myself and then go out in public.  I promise.  Although if they could chew on my pants while I shopped…..

1-men8

What you need:

a small baby doll (You can buy the one I used here from Target.)

sweats, mismatched clothes, or PJs you already have

food for splattering and real and/or fake food for gluing on to clothes

house shoes

hairspray to mess up their hair

hot glue gun, scissors, fine point sharpie, and black and white felt to make a baby bjorn

Optional but totally cute:  I used a baby doll diaper bag with a diaper and bottle for her trick or treat bag and had an empty coffee cup for an accessory

1-men7

1-mendel5

1-men9

1-10989489_10153747817999433_2101694392396608614_n

12191073_10153747816109433_6428607820009374870_n

Everyone laughed watching her walk around.  Free, fast, unique and, is there anything cuter than a baby wearing a baby?????!!!!  No.

(I was Rainbow Dash’s mom to a Rainbow Dash not pictured. You know, if you were wondering.)

Pin the mess outta this guy and follow me here and all of my social media accounts!  You can see past year’s costumes here and here towards the end of this post.

Photo credit:  Shelly Griffin Photography

Homemade Halloween Costumes

30th October 2015

This year I tackled all three of my daughter’s costumes.  They are all no sew, handmade, and 10 dollars and under!  Ever since I started making bouquets and wreaths with felt, that fabric has become my jam.

Eden loves pizza so I thought I would make her one.  Pepperoni, cheese, sausage, olive pizza! Comfortable, lightweight and so cute!

Play-Doh is my second child’s favorite thing.  Seeing my brother in a scary clown mask, is not. Thus, her impending devastation but moving on.

You can smooth out the colored lip of the can to stand out like a real lid.  I didn’t for these pictures though because it was crazy when we showed up to trick-or-treat.

Introducing the toy claw machine, baby edition!  There is a baby in there.  I confused everyone because I told them she’d be dressed as a dog, yet she wasn’t a dog for Halloween.  Oooooooo, the plot thickens.


Fresh hot glue strings still dangling form the claw from the last minute panic of getting it finished and getting to meet everyone to trick-or-treat.


Tutorials to come on all of these get ups!

DIY Claw Machine Costume

26th October 2015


Tah-Dah!  I did this for 4 dollars, y’all.  If you had to buy a few things, it shouldn’t cost you more than 10.  This is real life.

Supplies:

Stuffed animals from around the house

Free box from friend that I cut with a bread knife…makes sense

Black paint and construction paper or sheet of yellow adhesive foam

Zip tie & binder clips

Hot glue

Packing tape

Animal outfit for your child ( I borrowed one) or face paint etc. to make them an animal

I had ALL of these things at home, minus the box I got from a friend.  I painted the box and made some circles from yellow sticky foam to look like lights for the front of the box.  Next, I affixed the box with packing tape to the stroller tray and filled up the space with my stuffed animals.  I safety pin a few together and even hot glued a few.  You know you don’t need or care about all of those stuffed animals so it was an easy sacrifice.  If you put the box flaps down, it gives a ledge for you to pile the stuffed animals on, plus a large rim to tape down to the stroller to attach it.

To make the claw, I hooked several binder clips/rings together to make the chain and put a zip tie through the top ring to attach it to the center of the box.  For the claw, I opened to binder rings completely and hot glued them like crazy at the center with the clips opening in opposite directions to make it look like a claw grabber.  Once I had a finished claw, I glued that bad boy to the dangling binder clip chain and boom baby.  Throw a human dressed like an animal in there and you are done.  People loved the heck outta this thing!

Pin and enjoy, friends! Follow me on here, Pinterest, and social media, ya heard?!


1-20141031-IMG_2918-001


WP_20141031_16_57_43_Pro


20141031-IMG_2869


Easy DIY Ghost Suckers

20th October 2015


Originally on my blog, www.the1sthundred.com, but it’s still me guys.  

Here’s a throwback to Halloween treat I made with my mom as a child in the late 80s. Today I made them with my toddler to give to her friends at church. Just take a Kleenex, wrap it around a sucker, tie a string at the neck, and draw a face with a Sharpie. Boom: old school, cheap, and easy Halloween DIY to do with your kids.

 20131015_165015

20131015_165042

Pizza Costume Tutorial

20th October 2015

20141031-IMG_2874-001


This is the most VERSATILE and easiest costume to make. If you can think of anything that’s a triangle:  candy corn, pie, ice cream cone, cheese, slice of watermelon, etc., you can use this tutorial and customize it to your heart’s content!

It’s no sew and cost me $7.50 to make!


Materials:

1 yard of tan fabric folded in half {for my 4 1/2 year old of average height-use your 40% off Hobby Lobby coupon to do this costume for the price above}

4 sheets of red felt

5 sheets of cream felt

2 sheets of black felt

2 sheets gray felt

Good fabric scissors

Hot glue gun and glue sticks

Bowls in two different sizes

A cup

A shirt from your child’s closet for measuring purposes


Instructions:

1.  Fold your yard of tan fabric in half.  Hold it up to your child and mark approximately the length you want the end product to be.  Mark lightly.

2.  Find the center point to be the tip of your pizza slice and cut out a triangle.  Make sure to keep the folded part the top of the pizza so a neck hole can be cut out to be worn and draped over your child.

WP_20141011_21_15_17_Pro


WP_20141011_21_15_44_Pro

3.  Next you need to cut the neck hole.  Using a shirt from your child’s closet, place the neck hole of the shirt in the center of the crust to measure the width your cut should be. Mark with a pen.  Then measure from the center of your child’s shirt from the back of the neck, to lowest center part of the curve of the neck so you will know how low to go when cutting the neckline.  Remove the shirt,  mark the center of the neck line based on your measurements and cut out.

WP_20141011_21_18_04_Pro


WP_20141011_21_21_07_Pro

4.  Get your cream fabric and cut large abstract pieces to look like melted cheese.  You can also do strips and make the cheese look shredded.  Cover your pizza with the cheese and find the lay out that looks best.

WP_20141011_21_41_49_Pro

5.  Get two different size bowls and trace and cut out pepperonis from your red felt.  Lay them over the cheese.

6.  Use your gray fabric to create round scallop shapes to be your sausage.  Arrange the sausage over the other “ingredients”.

WP_20141011_21_44_13_Pro

7.  Lastly, using a cup from your kitchen, trace and cut out olives from your black felt and arrange them over your pizza.

8.  Once you are pleased with your lay out, begin hot gluing the ingredients to the pizza.  Once they are all attached, flip your slice over and trim off the overhanging felt.

WP_20141011_21_55_36_Pro

9.  Cut four strips of tan felt of the same length and width to make ties to go under the arms of the costume.  Put the costume on your child to see where the strips should be attached.  I marked where I should glue my ties with safety pins before taking it off of her.  Once you have found the placement you need, attach them to the inside of the crust. You can see the finished ties in the first image of this post.

WP_20141011_22_04_26_Pro

The pizza was blowing in crazy winds but still looked cute!  I’m going to save their costumes for her kids one day.  See the Play-Doh tutorial here.

20141031-IMG_2861


 PIN AND ENJOY!

DIY Play-Doh Costume Tutorial

18th October 2015


20141031-IMG_2906-002
Materials:

Embroidery Hoop {Size Based On Size Of Child- I used an 18 inch for my 2 1/2 year old.}
Hot Glue Gun & Sticks
1/2 Yard of Yellow Felt
1/8 Yard of Colored Felt Of Your Choice
1 Sheet of White Felt With Adhesive Backing
1 Sheet of Red Felt
Good fabric scissors

Time:
Approximately 45 minutes-1 hour

Cost:
10 dollars {Using 40% off coupon Hobby Lobby Coupon for yard of yellow felt and embroidery hoop}

Steps:
1- Hold up yellow fabric to child and measure where you want it to fall in length and cut if needed. I did not need to cut mine.
2-Take out interior ring from center of embroidery hoop. This will be the frame of your Play-Doh can.
3-Fold top edge of yellow felt over top of hoop, hot gluing it as you go. If you pull it just a little taut, it will create a little ledge, giving the appearance of a can.

WP_20141018_21_12_23_Pro

WP_20141018_21_12_11_Pro

WP_20141018_21_14_00_Pro-001

4- Cut a strip of colored felt approximately 6 inches to create lip of can, again hot gluing over the embroidery hoop. Make sure the closing edges of the yellow felt match with the closing edges of the blue felt so that you have them center in the back. You don’t want to see “seams” in the sides or, heaven forbid, front of your costume. Measure how far down the colored lip of the can will fall very well before gluing.

5. Use left over colored felt to make two shoulder straps so the can–can be worn. I measured the spacing of these while my husband helped hold the hoop over my toddler. Hot glue the straps to the top interior edge of can, pulling very taut. I glued them once, then pulled them even tighter and re-glued the slack.

6. To make the logo, what I did was simple. Pull up the logo on the site logonoid.com. Download the image and open it in whatever sort of picture viewer you have on your PC. Magnify the image on your screen to the size you need and then put your white felt with adhesive backing over the screen. The screen will create a back lit effect allowing you to lightly trace the logo onto the felt with a pencil. When you trace the wording, also trace the shape of the red arching behind the wording. Using quality fabric scissors, lay your traced sheet over a red sheet of felt cutting out the shape of the red arching first. Set red arch aside and then cut out the words on your white felt. Remove adhesive backing, center the words on top of the red felt and BOOM! You look way more talented than anyone ever has to know! I layered the red background with a thin line of color to match the can lid and the original logo.

7. Hot glue the logo to the center of the costume. Be careful to space this well before you glue. You will need to put your hand behind the inside of the costume, smoothing the logo from both sides as glue you since it needs to lay curved over the front. It’s the only way to keep it from bunching.

8. Lastly, I cut a large u shape out under each side of the hoop so that she could easily move her arms however she needed. To keep it even, I cut the big “U” out of a piece of cereal box and drew it on each side before cutting. I put her in the costume to measure about where each arm hole should fall before making any cuts.

Colored lid can be smoothed by hand and it really looks like a can lid! I, however, did no such smoothing in the freezing artic winds that were blowing us around! You can also simply wrap the felt for the lid to fit the underlying hoop leaving no overhang. That would be even more simple and no worries about it bunching.

1380413_10152855564249433_8524848043240430652_n


Pin and enjoy! Check out my other costume creations!

DIY Gingerbread Man Costume

1st November 2013


WP_20131031_16_26_46_Pro

(The watermark up there is from my other blog.  Promise…I’m still the gingerbread man maker.)

When my funny 80’s play on a costume fell through last minute, I decided to make my youngest something different-ish and downright cute.  This DIY outfit I created is super easy and cheap and while we’re at it, rings you right in to some Ho Ho Ho!  I made it the night before Halloween in about 30 minutes and guess what….no sew!!!!!  I know how to sew and even I’m excited that I didn’t have to.

Supplies:

Chocolate brown Granimals sweatpants from Walmart (toddler boys):  $3.88

Chocolate brown Granimals turtleneck from Walmart (toddler boys):   $3.88

One roll of peppermint print ribbon:  $1.50

2 packs of jumbo rick-rack @ $1.66 each:  $3.32

2 sheets of felt:  .50 cents player

hot glue sticks I had at home:  free

Total:  $13.08


What I did:

Well, it’s nothing scientific!  I put the clothes on my daughter and marked with my finger about where the rick rack needed to fall.  I did the top pattern first and then laid out the pants with the shirt to see where I should start the rick rack on the pants to make it meet together.  I laid it all out and hot glued it down as I went.  Can you say easy?

Then I just cut out one side of the “jacket” freehand with scissors by cutting the sheet directly down the middle and trimming out the jacket curves.  Once I trimmed one side to perfection, I laid it on the other half of red felt and trace cut it.  Then I backed it with green felt for a peek-a-boo contrast.  I laid the jacket on top of the costume and trimmed it at the shoulders to fit and adhered it to the shirt with good ole’ hot glue.  I think I could build a house with hot glue.

Lastly, I used a bottle cap to trace circles on to the peppermint ribbon to make my buttons and then I tied some more of the ribbon into a little bow tie number.  I attached the buttons and bow with hot glue, rick rack detailed the front of the jacket and in about thirty minutes, I had one heck of a pretty polished, cheap Halloween costume that you are pretty dang sure not to see on the streets of your town.

I wish the pictures below were better but hey, it was tornadic weather outside and dark inside with terrible lighting and a toddler who wants to see the picture as soon as you get set to take it.  It’s what I’m workin’ with.  Pin me and follow me here an on Pinterest.  Tomorrow I will post my other daughter’s costume I made that I’m POSITIVE you didn’t see last night and probably never have!