Tag Archives: DIY

Lochness Monster Party: Her Party Pants Original

14th August 2017


I geeked out big time on this party with word play and details that doubled for my son’s birthday and the existence of Nessie.  Rarely do I geek out…this was full on geek.  I prefer ganster rap, but every blue moon, I get nerdy….

I loved doing this party, aka the first one I’ve ever done for a son!  I did a little party for my friend’s son (Food Fight Party), but other than that, this is the only other boy shindig I’ve ever done.

I for real believe in the Lochness Monster, but don’t let that run you off.  You have to at least believe in him for 5 seconds with me.  Come on, it’s magical.

For those of you that don’t know, Lochness is a sea dinosaur that has been spotted hundreds of times over decades from Scottish locals around the Lochness Strait, to tourists, to images from Goggle Earth.  It’s basically my favorite mystery.

Check this party out, buddy.

I drew these Lochness guys freehand on scrapbook paper while looking at shilouette images on-line.  I was pretty proud of them, because even though I am somewhat artistic, the more life-like, the harder.  And for an even sweeter detail?  Read the caption on the picture below!


I wasn’t sure if anyone would say anything about me using a gold glitter banner for a boy’s birthday, but since my son can’t talk or have opinions….gold glitter it was!  I had this custom made from Contagious Events on Etsy.  The quality was great and I love the black and white baker’s twine it came with that the letters hung on.  HIgh five team, Contagious Events.

I was super giddy at how the “so happy you exist” idea was perfect for a birthday and for believing in Lochness.  I’m not gonna lie. I stole it from a greeting card.  Good job, whoever you are who thought to put that on a card with a creature like this.  You win today’s favorite person award!

If this cake doesn’t give you all the monster feels, than you must not have feels.  I drew a detailed color diagram of the cake that I wanted for 3 reasons:

1- I am a past cake decorator and I have a specific vision for my cakes.

2- It’s the only way to almost guarantee you get what you want!  I recommend drawing your orders if you can if it is a cake you are creating.  If not, definitely bring a good picture of what you want.

3- I’m a dork about cakes.  Here is one I made for my daughter’s 1st birthday party many moons ago.  But let’s get back to Nessie…

This cake was made by Sweet Temptations, a local bakery in my hometown that I use for all of my cakes when I can’t muster the strength to make one…which is almost always.

The detail on the face was a million times above and beyond what I had hoped for.  I drew the most simple Lochness head of all fondant times.  I ADORED this little guy!

I deserted the “Happy Birthday” for “Love You A LOCH”….get it….wordplay….fun for days.  And don’t miss the tail detail on the side of the cake there.  LOVE!

These Target plates by Cheeky were perfect for my party because not only was the color scheme correct, it looked like waves/Nessie hump.

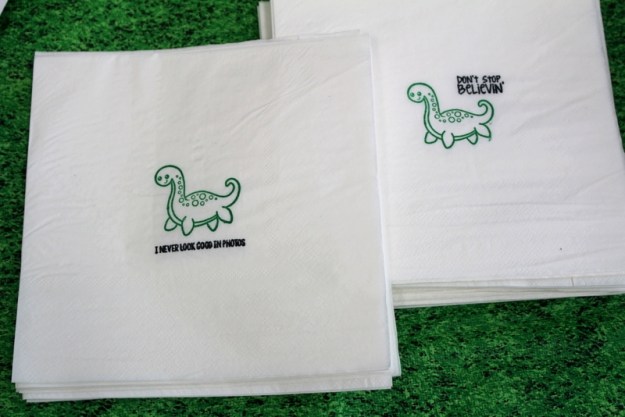
DON’T STOP BELIEVIN’

AND my favorite….

I NEVER LOOK GOOD IN PHOTOS

Ha ha, get it…people are always trying to get good pictures of him….

I found some Lochness stamps on Etsy at  The Crafty Carvery .  They were very fast and 3 cheers for them providing something unique!  The Lochness was whimisical enough to add some childlikeness to this 1 year old birthday party.

Using waterproof inking pads, I stamped Nessie and each sentence individually.  It actually doesn’t take that long and after I made my own napkins with stamps for the fiesta baby shower I just threw, it’s become a love of mine!  Whenever you can, go custom!  Keep it original!

In case you missed it above, and I can’t allow you to, “I never look good in photos” is what these high five napkins say.

I found this Lochness figure (Elasmaosaurus) on Amazon and made him appear to float in the chocolate milk for the kids.  It looked like he was right at home in his lake water.

Somebody call the doctor!  I’m going to have a stroke for these little favors I gave to the guests. I bought these little glass candy jars from Amazon and spray painted the lids to be color appropriate. It took less than 5 minutes to get them all coated and finished sooooooo that is pretty super.  I purchased these stickers that I used on the side of the jars from my favorite custom, has anything you want site: Zazzle.  This image is of the famous scam picture taken many moons ago that became famous.  I know that because I’ll give you a hint about me and Lochness and it rhymes with…week.  No, it’s not that I’m on fleek.  But this party might be…

These super sweet jars hold 5 Hershey Kisses and the stickers on the bottoms with my son’s face, hold about all of my dreams! I found them at Silly Wise Kids  on Etsy.  This shop offers several face customizable party products.  I thought it was an unexpected and fun little detail!

I simply cut the huge letters out of gold poster board that i laid vertical for extra height.  If you aren’t too good at free-handing, and trust me, I didn’t want to freehand these, I have a stellar tip. Go with a pencil in hand to Hobby Lobby to purchase your poster board and while you are there, go get some of their huge wall letters and trace them on to your poster before you buy the poster.  I meant to but I left my pencil, because something always goes wrong when I go on kid free errands.  Truth.

The Nessie details I cut out of left over scrapbook paper from the Lochness famiy I made for the backdrop.

The kid’s table was sooooo much fun!  A grass tablecloth underneath a blue flowing water tablecloth, which is just a plastic one I cut a bunch of curves into. This grass cloth here is really a heavy plastic lined printed one from Party City, but I really wanted a textured grass one like this one here on Amazon.  It is technically a rug but thin enough to be on a table.

Last but definitely not least, I bought a Styrofoam cake dummy, cut it in half, and spray painted it to make look like humps coming out of the water.  When this idea hit me, I couldn’t wait to find something to make the humps with and these cake rounds were perfect! I bought my cake dummy from Hobby Lobby, but you can buy one just like it here on Amazon for 9 bucks and some change.

I used plastic tablecloths to turn the adult tables into huge Scottish flags.  Hip hip hooray!


If this balloon garland doesn’t change your life, nothing will.  I don’t want to throw anyone for any curve balls here, but I had the colors customized and ordered it from Twigs and Twirls LLC on Etsy.  In my heart, I hoped it never deflated, but in real life, my kids ripped it apart after the party and had a blast with it.  I love this Etsy shop/site and I will use them again for a party source!

Since Lochness is all about sightings, I used the stamps I used for the napkins and stamped 45 of these critters and cut them out to hide around the room.  Whoever gathered the most sightings, won a Target gift card!

“You’re my favorite Monster” so sweet for a 1st brithday!  This is a tiny bag I stamped and stuffed for the prize for the Lochness sightings game.

Just like for my daughter’s Ketchup and French Fry Party and my oldest’s Diaversary party, I bought a custom party shirt for the person of honor which was this little man this time.  I bought this shirt from Zazzle, one of my 2 favorite custom sites.

This just in:  he’s been caught!  I knew I was right.

Happy birthday my sweet boy!

Pin, Share, Enjoy!

Any comments or questions?  I’d love to hear them!  Follow me on Instagram, Pinterest and Facebook using the icons in the sidebar to keep up with my affordable, unique parties, ideas and DIYS!
DIY Mason Jar Snow Globes

2nd December 2015


1-20141110-IMG_3083-004

Make a craft that makes you look like Martha!  Really, these take no skill!  Anyone can do these beauties. I had a craft party at my house and we all made snow globes and other cute crafts soon to grace this blog!  Thanks to Shelly Griffin Photography for the pretty pictures of these creations.

You will need:

Glitter

Small craft trees {These seen here are from Hobby Lobby, Walmart, & Michael’s.  Yep, I had to go three places to find three sizes. Awesome.}

Mason Jar

Super Glue

Decoupage

Washi Tape if you want to embellish the lid like you see below.

Little deer/bunny/squirrel figurines {I didn’t get them for these jars ,but I die for them!  Check out the dollhouse section of Hobby Lobby for these.)

Steps:

Super glue, not hot glue, the trees to the lid

Decoupage/seal in some way the metal tips of the trees and let dry so they don’t show rust when you look at your tree tops

Put a spoon full of glitter into the bottom of the empty jar

Fill the jar with water

Screw on your lid with attached trees

Shake it like a Polaroid picture


20141110-IMG_3098-2

The jar above has tinted water due to the trees bleeding color.  It was a neat accident.  I guess you could always use food coloring if you dig this and your trees won’t share their color. The one below has a lid trimmed with Washi tape.  So cute!

20141110-IMG_3102-2

Follow Me, Pin, Try & Enjoy!

Gifts in Jars: DIY Mixes and Seasonings

24th November 2015

20141110-IMG_3160-003

Do you know someone who is a mom, loves to cook, likes to eat more naturally, loves creativity, likes practical gifts, and loves to save money?  Me too, sister.  Enter this gift idea that I can’t wait to give and would love to receive.

Make knock off baking mixes/seasonings and put them packaged in cute jars.  Above I made onion soup mix in the large jar which is great for roasts.  In the smaller jar, I made Rachel Ray’s homemade taco seasoning.  It’s all of the yummy with none of the junk and preservatives that come in the pre-made packs.

I embellished the jars with washi tape a.k.a my new addiction, twine, craft paper, a chip board letter colored with a metallic pen, dye cut doilies and gift tags tucked in mini craft bags.  The recipes were written on the tags inside the bags with a gold pen.

The full recipe for the onion soup mix is shown. 5 tablespoons = 1 packet. I tripled it for this jar.  The full taco seasoning mix is not shown on the card because it’s two sided so don’t make it how you see it here.  You’ll be bummed.  See that recipe here.

20141110-IMG_3157-2

20141110-IMG_3149-2

20141110-IMG_3180

Follow me, Pin, Try & Enjoy!  Search “gift ideas” on my site for more inspiration.


Washi Tape Gift Tags

12th November 2015


20141110-IMG_3074-2


20141110-IMG_3124-2

20141110-IMG_3191-001

20141110-IMG_3217 (1)-001

Buy blank mini cards and envelopes and embellish with washi tape.

20141110-IMG_3216 (1)-001


I bought these cheap paper doily die cuts from Hobby Lobby in three colors. Use them with stickers and wrap them in washi and holy cow, I love!  I originally made a version of these for my baby shower in a box that I did for Shutterfly.  At my craft party, my friend made the two bigger bag tags/gift boxes.  The “Just For You” Stickers came from Hobby Lobby and were used in the baby shower box blog as well.

1-20141110-IMG_3190

20141110-IMG_3198-001

Wrap chip board letters in washi tape.

20141110-IMG_3138-2

 Bakers twine is a cute combo with any gift in a million ways and I’m loving using it with these tags like the one I made above for the Spice Tea gift bottles.

I’ll be posting a few more of these tags that I made on my Facebook page.  Follow me there and on Pinterest.  Pin and enjoy!

Homemade Halloween Costumes

30th October 2015

This year I tackled all three of my daughter’s costumes.  They are all no sew, handmade, and 10 dollars and under!  Ever since I started making bouquets and wreaths with felt, that fabric has become my jam.

Eden loves pizza so I thought I would make her one.  Pepperoni, cheese, sausage, olive pizza! Comfortable, lightweight and so cute!

Play-Doh is my second child’s favorite thing.  Seeing my brother in a scary clown mask, is not. Thus, her impending devastation but moving on.

You can smooth out the colored lip of the can to stand out like a real lid.  I didn’t for these pictures though because it was crazy when we showed up to trick-or-treat.

Introducing the toy claw machine, baby edition!  There is a baby in there.  I confused everyone because I told them she’d be dressed as a dog, yet she wasn’t a dog for Halloween.  Oooooooo, the plot thickens.


Fresh hot glue strings still dangling form the claw from the last minute panic of getting it finished and getting to meet everyone to trick-or-treat.


Tutorials to come on all of these get ups!

Halloween Costume Round-Up

30th October 2015


EVERYONE knows I LOVE  a creative Halloween costume.  Most of the times, creative has to be made and these below costumes are my favorites that I found.


1.  Mary Poppins

marypoppins

2.  Popcorn Vendor and Popcorn

 popcorn

3.  Ursula

ursula

4.  Care Bear Family


a385f60b48578300471dae38952883b3

5.  Raisin Girl

 raisin

6.  Snow Globe

snowglobe

7.  Moose

moose


8.  Mousetrap

 mousetrap

9.  Penny

penny


10.  Yearbook Photo


yearbook

11.  Gumball Machine

Untitled-201

12.  Fresh Prince and Carlton

enhanced-buzz-26802-1351793264-28

 Here are three pictures of what I’ve made my own kids over the past few years.

13.  Car Air Freshner 2010

68755_447477243334_6426774_n

14.  Crazy Cat Lady I made in 2011

halloween-012-768x1024

halloween-036-768x1024

halloween-025-768x1024

15.  Dippin Dots Costume I created 2012

550361_10151141565678335_325203064_n

22522_10151141565513335_1222012798_n

PIN ME!

Love A Mom-To-Be From Afar: Baby Shower In A Box

26th October 2015


If my love for creative gift ideas and my love for my friends had a baby, it would be this idea:  Baby Shower In A Box.  As you get older and your friends scatter, it’s hard to get to them for all of the big events in life.  I recently had a friend who was adopting a baby girl and the problem was, she lived in a different city but I still wanted to do something special for her.  My idea for a baby shower in a box was born when I thought, “How neat would it be to send to her what I can’t do in person?  I’ll send her a party to her door!  Her own baby shower!”

Thus, I present to you the idea of planning and creating a party for someone that you pack and ship right to your loved one’s door!  You can make it any theme and in any price range.  I promise that you will be the only one giving them this gift.  It’s sort of a double gift:  a party and the gifts for the party.

Special thanks to Joel Ham Photography for making my idea come to life in these beautiful photos.  Check them out on Facebook and on their personal site.

Here’s a look at what I created:

BabyShowerinaBox-2


This is a baby I borrowed, along with a box I bought and embellished.  Using scrapbook paper, chalkboard stickers, and an oil-based Sharpie, I made this “Baby Shower In A Box” label.  I will wrap the front in packing tape when it’s shipped so it will be delivered with this on the front!


BabyShowerinaBox-4


When she opens the box, the first thing she will see is this handmade invitation I made to match the decor for the front of the box.


BabyShowerinaBox-16


What’s in the box?  Well, a whole shower so…

  • An invitation
  • Cake mix and icing to make the shower treat with her son
  • Paper goods:  napkins and plates
  • A helium balloon that will pop-up when the box is opened
  • Gifts:  a dress for later, a onesie for now, and a headband to grow with her
  • Party Game with a game prize AKA a treat just for the mom
  • Big Bro Bag because you can’t forget the older sibling(s) while showering the new little squirt
  • Something for the nursery.  I ordered the print shown from Mandipity on Etsy.


BabyShowerinaBox-14

BabyShowerinaBox-6


What’s in the bag?  For the sibling bag I just put in a bunch of cheap thrills:  bath bombs, Ninja Turtle cup, Ninja Turtle bubble wand, M & M tube, and a party of pack of glow stick glasses and wands.  If the bag is for a little girl you could include: nail polish, pink cookies, glitter pens, plastic tiara, or one of the many paperbooks about being a big sister.  Lots of popular characters that both boys and girls love have cute books on becoming a big sister/brother.

If you want to go all Martha on the bags, check out my post on Big Sister Bags and Busy Bags for Toddlers for more specific bags that will really make a mom cry tears of jubilee.  You can do these for yourself pre-baby to build in a little sanity for after the baby comes.  Hey, if no one sends you a bag to busy your kids, by all means, be your own hero.


BabyShowerinaBox-8

BabyShowerinaBox-9

BabyShowerinaBox-3

BabyShowerinaBox-16


How did I make the box that holds the prize? I took a plain white gift card box from Hobby Lobby and embellished it to match my party theme. Using washi tape, a doily die cut and a chalkboard sticker, this little box became my favorite party detail.  And just for all you curious cats, the prize was a gift card to Starbucks for the mom because EVERY mom needs a little Star-cation.


BabyShowerinaBox-11


One small detail you might have overlooked is the doily banner strung on twine across the backdrop.  That actually coordinates with the whole theme and will be sent in the box as more of the “party decorations”.  A banner can be personalized and used in the nursery or can be pulled back out and used it at their first birthday party.  It’s a sentimental touch and I’m a sucker for that.

If you want to add a few pieces that are personal to your special celebration, yet doesn’t require a crafty hand, the home decor space within Shutterfly has everything from custom art, plates, and pillows.  I love the chalkboard pillow or woodgrain monogram pillow print for a nursery I also adore the personalized placemats for kids as a big sibling gift.


BabyShowerinaBox


This gift is creative, personal, thoughtful, and has more possibilities than the Powerball.  It’s for any person, for any party, for any celebration! Now that’s versatile! You don’t have to be close to a friend to be a part of the experience.  Pin, share and enjoy!


Pizza Costume Tutorial

20th October 2015

20141031-IMG_2874-001


This is the most VERSATILE and easiest costume to make. If you can think of anything that’s a triangle:  candy corn, pie, ice cream cone, cheese, slice of watermelon, etc., you can use this tutorial and customize it to your heart’s content!

It’s no sew and cost me $7.50 to make!


Materials:

1 yard of tan fabric folded in half {for my 4 1/2 year old of average height-use your 40% off Hobby Lobby coupon to do this costume for the price above}

4 sheets of red felt

5 sheets of cream felt

2 sheets of black felt

2 sheets gray felt

Good fabric scissors

Hot glue gun and glue sticks

Bowls in two different sizes

A cup

A shirt from your child’s closet for measuring purposes


Instructions:

1.  Fold your yard of tan fabric in half.  Hold it up to your child and mark approximately the length you want the end product to be.  Mark lightly.

2.  Find the center point to be the tip of your pizza slice and cut out a triangle.  Make sure to keep the folded part the top of the pizza so a neck hole can be cut out to be worn and draped over your child.

WP_20141011_21_15_17_Pro


WP_20141011_21_15_44_Pro

3.  Next you need to cut the neck hole.  Using a shirt from your child’s closet, place the neck hole of the shirt in the center of the crust to measure the width your cut should be. Mark with a pen.  Then measure from the center of your child’s shirt from the back of the neck, to lowest center part of the curve of the neck so you will know how low to go when cutting the neckline.  Remove the shirt,  mark the center of the neck line based on your measurements and cut out.

WP_20141011_21_18_04_Pro


WP_20141011_21_21_07_Pro

4.  Get your cream fabric and cut large abstract pieces to look like melted cheese.  You can also do strips and make the cheese look shredded.  Cover your pizza with the cheese and find the lay out that looks best.

WP_20141011_21_41_49_Pro

5.  Get two different size bowls and trace and cut out pepperonis from your red felt.  Lay them over the cheese.

6.  Use your gray fabric to create round scallop shapes to be your sausage.  Arrange the sausage over the other “ingredients”.

WP_20141011_21_44_13_Pro

7.  Lastly, using a cup from your kitchen, trace and cut out olives from your black felt and arrange them over your pizza.

8.  Once you are pleased with your lay out, begin hot gluing the ingredients to the pizza.  Once they are all attached, flip your slice over and trim off the overhanging felt.

WP_20141011_21_55_36_Pro

9.  Cut four strips of tan felt of the same length and width to make ties to go under the arms of the costume.  Put the costume on your child to see where the strips should be attached.  I marked where I should glue my ties with safety pins before taking it off of her.  Once you have found the placement you need, attach them to the inside of the crust. You can see the finished ties in the first image of this post.

WP_20141011_22_04_26_Pro

The pizza was blowing in crazy winds but still looked cute!  I’m going to save their costumes for her kids one day.  See the Play-Doh tutorial here.

20141031-IMG_2861


 PIN AND ENJOY!

Simple Rainbow Theme 1st Birthday

9th October 2015


*Watermark says the1sthundred.com which is still me!  Different site

Hey, homies!  This is my second child’s 1st birthday party.  It was a rainbow theme and was simple, modern, and swag-tastic.  And, no,  I didn’t see these ideas on Pinterest but you can sure follow me on Pinterest via the link in the right hand column and feel free to pin away! Thanks to Shelly Griffin Photography for the excellent pictures!


044


I bought the swaggiest rainbow felt garland from Etsy from Sweet and Cozy Children’s Gifts.  I hung one from this light and hung another on the drink table on the island in our kitchen.  The “s” was a cheap last minute touch using a chipboard letter and some scrapbook paper.  Chevron is way overdone but it’s still really cute.

1-031

523585_10151557614099433_817289772_n

047


I decorated this cake to sort of play off of the invite.  It’s a modern take on a child’s cake and childish theme.  The cake is iced in buttercream and all other accents are made in fondant.  I love the big tall candles I found too.  If my child doesn’t like modern, she came from the wrong uterus!

333

I like making cakes where images spill over and I loved this big sun and it’s rays.

092


At this party I had an age range of guests from under 1 year to 12 years old so I had to do two different party favors.  Each child under 3 got one of these over-sized bright, rainbow colored patterned balls and a balloon as they left.  The balls were perfect for spring and the patterns and colors were great for the theme.  Best part?  They were only 2.50 each at Walmart.  Work it, Wally.  Even better?  The kids looked really cute with them.

088


For the older kids, I tried to think of something simple, colorful, and different than just candy.  SOOOoooooo, I bought Izze drinks which come in these glass bottles with cool logos.  These drinks are a different treat to most kids, organic, non-caffienated but carbonated so it gives the feeling of a soda. I paired them with wide mouthed paper colorful straws that I found in a 20 pack on clearance at Target.  I ran across these large favor bags at Walmart that covered the whole bottle and straw and I filled the bottom of the bags with large bright gum balls and Skittles (taste the rainbow), of course.  I bought these neat plain white tags and stamped them with orange ink and “thank you” stamp and tied them with orange ribbon to bind it all together.  28 dollars for all 9 completed bags.

041

Here’s a better view of the tags I made. These tags can be purchased at Hobby Lobby and they had other shapes as well. They were 2.99 a pack and I used my 40% off coupon so they were next to nothing. The stamps were all 50% off and an ink pad was only 1.99 so this was very affordable to do. I’m saving the left over tags for gift wrapping in the future.

1-038 1-041

183

Lastly, you need a sweet baby dressed in a rainbow colored outfit. I grew this one myself. Not available on Etsy =0) The outfit, however, can be bought at Old Navy.

327


I loved how this party turned out. It was simple, colorful, fun, and crisp! She really loved it.

167


True story.

Nursery Reveal: Home Sweet Home

4th October 2015


Hallelujah!  It only took me 13,000 years to post this!  Okay, she’s 8 weeks old, but it feels like forever. Especially it felt like forever to all my friends who weren’t allowed in the room the whole time it’s been done because I made them wait for this post. Off of our master,  this small little 10 by 10 room painted all white became the coziest little nursery and I love it.  Hope you do too! Read the captions to see what I did, what is still left to do, and where I got the decor.  Enjoy, pin, and please like this project on Project Nursery using the Facebook icon by my images and give me a star rating while you are at it!  Find it here. You guys are a bunch of rascals and I love ya’.

Before: Believe it or not, this was the original master bedroom of the house.  Here is the before picture from when we purchased the home.     beforeafter 006After: Wah-lah!  White floor to ceiling with pops of color.  New paint, new fixture, new everything but beadboard and floors!   20140725ParrottRoom050 20140725ParrottRoom045 20140725ParrottRoom051This stellar handmade blanket was a Land of Nod knock-off of one of their quilts but in transverse colors.  Want to snag this blanket or have one custom made?  Buy it here on the Etsy shop Slumber Spun.  This blanket was made for me and it was all the charm of Land of Nod for less expense with ALL of the same quality!  Anyone that has seen my nursery has commented on the cozy, thick crocheted blanket.  Stacy at Slumber Spun makes lots of items including the fox you will see below and baby booties that will make you smack your granny they are so cute.  Check her out!  You won’t be disappointed. 20140725ParrottRoom041You can really see how small the room is now when you see the crib and the closet on the other wall in the same close-up picture! 20140725ParrottRoom021This dresser was an antique buffet I bought in Tennessee.  I adored that it had the two doors on each side and not only was it cute, it has great storage!  It was originally cherry and I painted it white and used the original hinges, spray painting them a light gray color.  I don’t consider this part of the room totally done yet.  I want a small, subtle pattern lamp shade with gray tones for starters.  Now just to find one….. This lamp was originally 80 at Hobby Lobby and I snagged it on clearance for 25!  This rug is HUGE and indoor/outdoor so great for traffic.  I bought it from Target and had it shipped to my door, tax and all for 160! 20140725ParrottRoom047 The subtle theme of the whole nursery is “Home Sweet Home”.  It’s unique and not a phrase you see in nurseries and doesn’t it make your heart swoon to see a tiny baby next to this print?  I ordered the print from Katie Daisy, thewheatfield on Etsy.  You will DIE at all of her prints she makes.  They are all custom water colors of original art and you are buying a reprint of her work.  I had this large rectangle print trimmed into an oval and matted at Hobby Lobby and this awesome frame is from Ikea.  Ohhhh, Ikea.  I love you. WP_20140626_10_29_49_Pro I knew I wanted white walls with bright colors.  The color scheme of the room started with this sheet that I LOVE from The Land of Nod.  I want to marry that store.  It’s serious. Emerald, two tone pinks, off-beat orange, bright yellow….I mean COME ON!!!! WP_20140626_10_30_08_Pro   This killer Ikea light casts the COOLEST PATTERN on the walls and ceilings for my little one to look at. 20140725ParrottRoom053 20140725ParrottRoom017 Meet Mr. Fox also handmade from SlumberSpun on Etsy.  Contact her for these little guys!  She also makes an elephant like this attached to a crocheted blanked.  So precious!  So perfectly made! 20140725ParrottRoom008   WP_20140626_10_29_10_Pro Colorful ceramic knobs I nabbed from my sister’s house for my closet doors. WP_20140626_10_28_06_Pro (1)   WP_20140714_14_22_31_ProThis adds to hint of Home Sweet Home.  This vintage door knob and plate are a line from Young House Love who are bloggers who happen to run my favorite blog!  They have the neatest line right now at Target that you must check out!  I sprayed painted this originally white wall knob a pop of blue to coordinate with the room colors. WP_20140626_10_30_31_Pro The ceilings are a light gray that coordinate with the hardware of the antique dresser and tie the room subtly together from floor to ceiling.  It’s less dramatic in real life but still a touch you pick up on in the overall feel. WP_20140714_14_20_35_Pro Do you love this 1950 elephant sculpture???!!! I do!  I found it at a local consignment shop and when I saw it on the sidewalk as I drove by, I called right away to claim him.  I love him in the room and one day he may move on to be coated in a rustoleum outdoor gloss spray paint to live in a garden or around a swing set.  So many possibilities!   20140619-IMG_1543 This coca-cola crate is also an antique that I took from my father-in-law who gave me one from his collection.  I thought it was a fun way to display books in her room. WP_20140714_15_36_11_Pro

Tri-colored bird cages that I mixed and matched from Hobby Lobby.  On the inside are these neat little birds from West Elm that are made overseas from seed pods that look like birds!  They are 9 dollars each and ship for free.  I plan on hand painting some of them different tones down the road to compliment the room a tad more in spots.WP_20140714_15_34_48_Pro   WP_20140714_15_35_29_Pro WP_20140714_15_35_57_Pro   A stork seedpod bird in a nursery?  Of course. WP_20140714_14_23_52_Pro These prints that are the original artwork of the amazing Etsy shop SealDesignStudio.   For the home theme, I bought these row houses that are homes in Australia and the nursery print of Golidlocks and Three Bears, not only showed a little girl at home, but what is more perfect for a nursery than a fairy tale print?  Woo hoo!  Just wait until you see the other fairy tale print I bought for another daughter’s room.  This Etsy shop has all of my heart strings and I wasn’t surprised when I saw they were featured in West Elm.   WP_20140626_10_29_28_Pro And I HAD to end my home sweet home nursery with this amazing barnwood Kentucky silhouette for my Kentucky babies.  It’s personal and therefore has intention in the room.  It’s made of old barnwood so it’s unique and old.  I can use this in any room for the rest of our lives and I’ll always remember when our homestate hung above one sweet little baby. Love it!  I bought this from a local shop in hometown called Digs on the River and these states are made by a man in Tennessee.  If you are interested, contact me and I’ll get you the info.   Like on Project Nursery here!  Thanks!