Author Archives: herpartypants@gmail.com

Transform A Pillow With Paint

17th October 2017


This is really easy to do if you have a pillow that needs a color change!  I had been looking at this pillow I had made on Etsy for one of my daughter’s nurseries and I really didn’t want to part with it, BUT my son probably wouldn’t dig a cranberry pink pillow in his room. You know because 14 month olds have strong decor opinions…  A snail is perfect for any gender room so I took to the paint!  I bought a fabric paint in black, pulled out an old paint brush I use for details, and basically just colored it in like a coloring book!  Whip out cha’ steady hand and treat yo’self to a new pillow!  It’s a lot more affordable than buying new pillows every single time you change a color scheme.

Here it is in process so you can see it going down.  I just followed the lines!

Here it is completed! From pink to masculine and all for the price of a tiny bottle of fabric paint!  Nursery reveal coming next!  You know…since he is over a year old now. Literally, I am still trying to fill out the details.


Pin, share and enjoy and follow me here on all of my social media accounts (buttons in sidebar)!

Painted Rock Hide-and-Seek In Your Town

19th September 2017


My name is Rebecca and I have a problem with painting and hiding rocks.
It’s true. Seriously. My daughter drew a picture of me in church this week and it was me painting rocks. In the picture I’m yelling, “I love painting rocks!”

Have you heard of this in your town yet? I can almost guarantee that the hide-and-seek rock painting is going down in your town and if it isn’t, you should start a group on Facebook! You can even do this nationally with traveling rocks from state to state.

It is near free, creative and fun! So what is it, really? It’s this simple. You paint rocks, hide them in different popular locations in your hometown (parks, restaurants, etc.) and people find them and re-hide them, OR keep them and paint new ones to leave around somewhere new.

You can paint whatever you want and make them inspirational with quotes, make them funny, fancy, artsy….whatever you want! It is perfect for any age and little to no skill required!

You can join a Facebook group for your town and post pics with rocks as you find them and post clues as to where you have hidden rocks yourself! I posted that a restaurant in our town had been “rocked” and the 3 we hid were gone in 45 minutes. I don’t know why, but it is a cheap thrill (literally) to see someone stumble across your rock and get excited. And finding them is a blast, too!  My daughter found our first one outside of our town’s Qdoba and the rock came from a town an hour and a half away.  We felt like we found Wonka’s golden ticket.  We posted it on Facebook and the owner commented that was their rock.  So cool!

All you need to do is:

1- Get some rocks (I know, curveball.)

2- Get paints AND something to seal the finished stone with so that it can stand up to the weather. Polyurethane spray or some sort of sealing clear coat. Paint wise, I bought some acrylic outdoor paints for $1.47 at Hobby Lobby.

3. Write on the back of your rock your town’s hashtag and instructions, if you want. Example: #BGKYROCKS Post a pic on FB and re-hide!

4. Search on Facebook “painted rocks of __________”. Enter your town or state and you will find groups. If not, and you’ll be surprised where it already is, start your own with friends and watch it grow!

It is a fun, active, exploring, outdoor, creative, family friendly, budget friendly, challenge activity! I hope your children go on to make portraits of you painting rocks.

Better yet, HAVE A PAINTING ROCKS PARTY and then go out and hide them as a group! PARTY ON, WAYNE! PARTY ON, GARTH!

Follow me on my social media accounts in the right sidebar and keep the affordable and creative ideas a rollin’, Dolly.


Sarah’s Stitches: Custom Hand Embroidery You HAVE To See

23rd August 2017


Are you familiar with hand embroidery?  Girl, I wasn’t either and IT IS GLORIOUS and such a beautiful and intricate craft! The art below is the PERFECT, unique, and customizable gift that you can give, wear or decorate your home with!

Sarah from Sarah’s Stitches make the most INCREDIBLE custom and one-of-a-kind hand embroidery art pieces and jewelry.  It’s been a long time since something impressed me this much. She has raw talent and the detail makes me tired just looking at it.

It’s an old fashioned art, but with a modern and custom flare that makes me want to embroider my eye balls to a hoop of it so that I can never look away!

See the bottom of this post for a chance to win one of these pieces!


And now for your chance to win!

You know it is your heart’s desire to win this cactus necklace…

Win this 1.5″ wood mini embroidery hoop pendant on a 30″ brass chain and make your other jewelry necklace that they aren’t handmade.

To enter:

FOLLOW Sarah and her party pants on our Instagram accounts and COMMENT on the post with the Win Me image above.  Be sure to take note that Sarah’s Instagram has an “e” between Sarah and Stitches.  I made that mistake once before.  If you already follow us, GREAT! Just leave a comment as an entry ON OUR INSTAGRAM ACCOUNTS and for good measure, give this post a share on Facebook.

Winner will be announced this Friday on our Instagram accounts!  Happy winning! Thanks to Sarah for letting me share her work and for giving the ole’ party pants a giveaway!

Lochness Monster Party: Her Party Pants Original

14th August 2017


I geeked out big time on this party with word play and details that doubled for my son’s birthday and the existence of Nessie.  Rarely do I geek out…this was full on geek.  I prefer ganster rap, but every blue moon, I get nerdy….

I loved doing this party, aka the first one I’ve ever done for a son!  I did a little party for my friend’s son (Food Fight Party), but other than that, this is the only other boy shindig I’ve ever done.

I for real believe in the Lochness Monster, but don’t let that run you off.  You have to at least believe in him for 5 seconds with me.  Come on, it’s magical.

For those of you that don’t know, Lochness is a sea dinosaur that has been spotted hundreds of times over decades from Scottish locals around the Lochness Strait, to tourists, to images from Goggle Earth.  It’s basically my favorite mystery.

Check this party out, buddy.

I drew these Lochness guys freehand on scrapbook paper while looking at shilouette images on-line.  I was pretty proud of them, because even though I am somewhat artistic, the more life-like, the harder.  And for an even sweeter detail?  Read the caption on the picture below!


I wasn’t sure if anyone would say anything about me using a gold glitter banner for a boy’s birthday, but since my son can’t talk or have opinions….gold glitter it was!  I had this custom made from Contagious Events on Etsy.  The quality was great and I love the black and white baker’s twine it came with that the letters hung on.  HIgh five team, Contagious Events.

I was super giddy at how the “so happy you exist” idea was perfect for a birthday and for believing in Lochness.  I’m not gonna lie. I stole it from a greeting card.  Good job, whoever you are who thought to put that on a card with a creature like this.  You win today’s favorite person award!

If this cake doesn’t give you all the monster feels, than you must not have feels.  I drew a detailed color diagram of the cake that I wanted for 3 reasons:

1- I am a past cake decorator and I have a specific vision for my cakes.

2- It’s the only way to almost guarantee you get what you want!  I recommend drawing your orders if you can if it is a cake you are creating.  If not, definitely bring a good picture of what you want.

3- I’m a dork about cakes.  Here is one I made for my daughter’s 1st birthday party many moons ago.  But let’s get back to Nessie…

This cake was made by Sweet Temptations, a local bakery in my hometown that I use for all of my cakes when I can’t muster the strength to make one…which is almost always.

The detail on the face was a million times above and beyond what I had hoped for.  I drew the most simple Lochness head of all fondant times.  I ADORED this little guy!

I deserted the “Happy Birthday” for “Love You A LOCH”….get it….wordplay….fun for days.  And don’t miss the tail detail on the side of the cake there.  LOVE!

These Target plates by Cheeky were perfect for my party because not only was the color scheme correct, it looked like waves/Nessie hump.
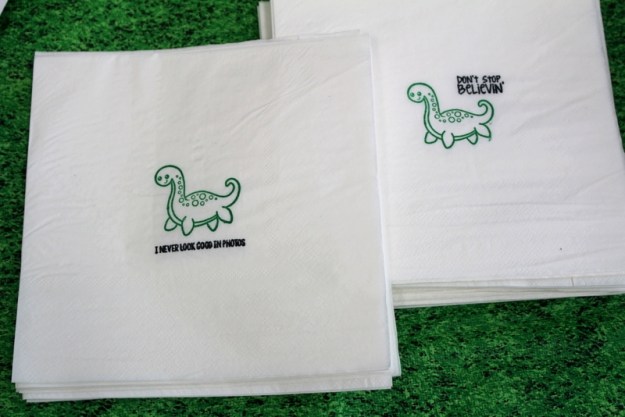
DON’T STOP BELIEVIN’

AND my favorite….

I NEVER LOOK GOOD IN PHOTOS

Ha ha, get it…people are always trying to get good pictures of him….

I found some Lochness stamps on Etsy at  The Crafty Carvery .  They were very fast and 3 cheers for them providing something unique!  The Lochness was whimisical enough to add some childlikeness to this 1 year old birthday party.

Using waterproof inking pads, I stamped Nessie and each sentence individually.  It actually doesn’t take that long and after I made my own napkins with stamps for the fiesta baby shower I just threw, it’s become a love of mine!  Whenever you can, go custom!  Keep it original!

In case you missed it above, and I can’t allow you to, “I never look good in photos” is what these high five napkins say.

I found this Lochness figure (Elasmaosaurus) on Amazon and made him appear to float in the chocolate milk for the kids.  It looked like he was right at home in his lake water.

Somebody call the doctor!  I’m going to have a stroke for these little favors I gave to the guests. I bought these little glass candy jars from Amazon and spray painted the lids to be color appropriate. It took less than 5 minutes to get them all coated and finished sooooooo that is pretty super.  I purchased these stickers that I used on the side of the jars from my favorite custom, has anything you want site: Zazzle.  This image is of the famous scam picture taken many moons ago that became famous.  I know that because I’ll give you a hint about me and Lochness and it rhymes with…week.  No, it’s not that I’m on fleek.  But this party might be…

These super sweet jars hold 5 Hershey Kisses and the stickers on the bottoms with my son’s face, hold about all of my dreams! I found them at Silly Wise Kids  on Etsy.  This shop offers several face customizable party products.  I thought it was an unexpected and fun little detail!

I simply cut the huge letters out of gold poster board that i laid vertical for extra height.  If you aren’t too good at free-handing, and trust me, I didn’t want to freehand these, I have a stellar tip. Go with a pencil in hand to Hobby Lobby to purchase your poster board and while you are there, go get some of their huge wall letters and trace them on to your poster before you buy the poster.  I meant to but I left my pencil, because something always goes wrong when I go on kid free errands.  Truth.

The Nessie details I cut out of left over scrapbook paper from the Lochness famiy I made for the backdrop.

The kid’s table was sooooo much fun!  A grass tablecloth underneath a blue flowing water tablecloth, which is just a plastic one I cut a bunch of curves into. This grass cloth here is really a heavy plastic lined printed one from Party City, but I really wanted a textured grass one like this one here on Amazon.  It is technically a rug but thin enough to be on a table.

Last but definitely not least, I bought a Styrofoam cake dummy, cut it in half, and spray painted it to make look like humps coming out of the water.  When this idea hit me, I couldn’t wait to find something to make the humps with and these cake rounds were perfect! I bought my cake dummy from Hobby Lobby, but you can buy one just like it here on Amazon for 9 bucks and some change.

I used plastic tablecloths to turn the adult tables into huge Scottish flags.  Hip hip hooray!


If this balloon garland doesn’t change your life, nothing will.  I don’t want to throw anyone for any curve balls here, but I had the colors customized and ordered it from Twigs and Twirls LLC on Etsy.  In my heart, I hoped it never deflated, but in real life, my kids ripped it apart after the party and had a blast with it.  I love this Etsy shop/site and I will use them again for a party source!

Since Lochness is all about sightings, I used the stamps I used for the napkins and stamped 45 of these critters and cut them out to hide around the room.  Whoever gathered the most sightings, won a Target gift card!

“You’re my favorite Monster” so sweet for a 1st brithday!  This is a tiny bag I stamped and stuffed for the prize for the Lochness sightings game.

Just like for my daughter’s Ketchup and French Fry Party and my oldest’s Diaversary party, I bought a custom party shirt for the person of honor which was this little man this time.  I bought this shirt from Zazzle, one of my 2 favorite custom sites.

This just in:  he’s been caught!  I knew I was right.

Happy birthday my sweet boy!

Pin, Share, Enjoy!

Any comments or questions?  I’d love to hear them!  Follow me on Instagram, Pinterest and Facebook using the icons in the sidebar to keep up with my affordable, unique parties, ideas and DIYS!
Simple Back To School Gift For Mom

31st July 2017

Have you sent your first child to kindergarten? It can stink to the emotional high heavens. Some moms are like “Bye Felicia” while some are crying in their coffee for hours after the first day drop off.

I have an empathetic spot for mommas in the sad bunch because it was a difficult transition for yours truly. I saw these note napkins last year at Kroger and fell in love with them. If you can’t find them at Kroger, Amazon has everything basically. You can probably buy human body parts on there. Anyways….

Wrap these napkins in a ribbon with a pen, small Starbucks card, and little encouraging note. While kids are still little, they love notes from mom and it gives a mom on the struggle bus a way to be there for her kid while they are gone. Plus, your child will typically be reading by mid-kindergarten so you can leave actual simple messages that they can read themselves as the year progresses.

This is also a great little gift for a child starting at a new school! (Disclaimer: Not big kids though because, they definitely don’t want this poppin’ out of their lunchboxes.)

Just a little thoughtful gift from one mom to another! Have a great first day back, whenever that may be for you! Your kid’s will love school and eventually, you’ll love it too. Mommin’ ain’t easy. #momsagainsteducation #babiesforever

DIY Cactus Letters

26th July 2017

I couldn’t think of what to do for an inexpensive but creative centerpiece for my sister-in-laws Fiesta Baby Shower.  I remembered seeing these big letters at Hobby Lobby and it hit me: cactus letters!  Admittedly, cacti are getting overdone and letters are way overdone but, every now and then, I like a few trends too much not to use them because they are just too cute for their own good.

It’s simple to do these and really cheap!  Take any letter, or shape for that matter, from the paper craft section of the store.  I’m not sure what you call this material…it’s like a thin cardboard.  Help me out, people?

Directions

Paint your shape with any craft paint, cut toothpicks in half with scissors, add a dab of hot glue and place each toothpick half pointy side up in each glue dot and get er’ done!  I used this craft paint here if you want to do it just like mine.

Lastly, attach any fake desert looking flower to the top of your piece like a good old real-deal cactus.  It’s that simple! You’ll notice I pointed the “cactus needles”  in sightly different directions for a real-life look.  It looks weird for them all to be stuck straight up and down.

You can do whole words, colored toothpicks, different colored letters, ANYTHING!  If you have a cactus themed room in your child’s room, you better do this right away!  I know I made this but….I think it’s adorable all while being on trend and not too cute-sy.  What do you think?

Pin, share and enjoy and make sure to follow me on Pinterest and  Facebook!

Fiesta Baby Shower

24th July 2017


Hey, girl, hayyyyyyy!  Check out this Fiesta Baby Shower for my sis-in-law this weekend!  Fiesta is a theme you have heard of but, not as common for a baby shower.  I love the bright colors and, obviously, the food.  The colorful theme is perfect for anyone who is hosting for someone who is having a rainbow baby (a baby after the loss of a baby).

I love all of these details and I put a source list for you at the end so you can see where I got everything. Ole, y’all!

Pin, share, and enjoy!


Nacho bar, fruit, and churros for dessert!  Small, simple menu that is on point with the theme.  Who doesn’t like Mexican food?!  Monsters, only I’m sure.

Believe it or not, that is 100 churros!  100 delicious foot long crispy, sugary goodness.  No cake for this party, just churros alll the way.  Make it more fabulous with ice cream and chocolate drizzle.  Another bonus is that it only cost 50 bucks for 100 churros!  This was in place of a cake/cupcakes and a decorated cake for 40 would have easily been 65 plus!  It saved money and spiced up the old traditional shower cake theme.

Do you love this M I made?  AHHHHHHH, I have a post just for this guy for tomorrow.  I was thinking for a week about what I could use at the centerpiece and when I thought of making this, I knew it would cute, unique and affordable!  AND this runner underneath, going across the food table?  I could have bought a serape for the table for a range of prices depending on where I bought one from and it would’ve been cute, for sure.  HOWEVER, how PERFECT does this tasseled rag rug under the centerpiece for a runner?!! AND guess what: 5 dollars from Five Below, a dollar store.

The kid’s table was ballin’ hard and out of control.  Too bad kids actually sat there because it was super pretty.

Is there anything more fabulous than these Spanish canned goods as vases? NO.  I used 2 sizes and you can see where to buy them on the source list.  These are real canned goods….not decor jars/vases.

These guys are a given.  You can buy them customized with words of your choice on Etsy.  Add the baby’s name to the banner or get ones that have “baby shower” cut out of some panels with baby theme designs.

If you can’t find a napkin you want….you make it!  I used waterproof ink so when the guests were wiping their faces, they wouldn’t be dragging pink all over the place.

I put these fans in the window above the kid’s table because nothing says cha cha cha quite like these colorful fans.  Maybe.


SOURCE LIST

Colorful fans, Banner, El Pato canned goods, tissue flower kit:  Amazon

El Pato cans can also be found on Etsy in groups

Rag Rug Runner: Five Below

100 Count Churros:  Gordon Food Service special order (GFS)

Fiesta Plates:  Hobby Lobby

Napkins:  Made by me using stamps from Hobby Lobby

Invititations:  Soiree Papery on Etsy

French Fry and Ketchup Birthday Party

9th June 2017


Woo hooooo!  When my now 3 year old asked for a french fry and ketchup party, I’m not sure who was more excited!  Check yourself on this super fun, simple and mainly ALL DOLLAR STORE party.  Below is all of the french fry and ketchup goodness you have ever hoped for!

Let’s start off with this entry way door with scrapbook paper splats I cut and a dollar store ketchup bottle.  The bottles came 2 in a pack for 1 dollar so basically all of my dollars cheered for joy in my pocket.  The BBQ products they had out this time of year sure came in handy!

Also, you can see through the doorway the island with the cute 3 dollar tablecloth from God’s country aka Target One Spot.  I’m not sure that “One Spot” should be capitalized, but it feels like a legitimate place so technically, it’s a noun for me.  The little red food baskets came 3 in a pack for one dollar from Mighty Dollar, which is a party secret weapon favorite.  Never underestimate dollar stores for ANY party….even for the President, guys.

This french fry garland below is cut up pool noodle, glued on to burlap string from Hobby Lobby.  I added ketchup splats to cover up the end pieces and the McDonald’s french fry boxes I literally swiped from some Happy Meals the day before not knowing how I would use them.  Yellow dollar store pool noodle for the win!

Large inflatable french fries from Target One Spot years ago that someone held on to and sold on Amazon.  Score-ville!  In real life it was probably about 9 inches across by 12 inches tall of super fun.

Work it, party people!  I saw ketchup favor tags on Etsy from thepapervioletshoppe.  I had her customize the wording and then I cut out the bottles from the tags, taped toothpicks on the back and smack your granny:  cupcake toppers.  They say, “She’s growing up! KETCHUP Mendel’s 3rd Birthday.”  And in case you didn’t know…Mendel rhymes with Kendall.  It’s Hebrew, y’all.


Hallelujah, I found these french fry food sticks from a fun Etsy shop: Cranky Cakes Shop with lots of vintage and off beat party accessories.  How perfect are these!!????!!!????

Look at these french fry boxes I used for party favor boxes!!!  I bought them 3 years ago from Target One Spot with a dream that they would someday, somehow, fit into my future.  Sooo glad I did!  I put the birthday girl’s favorite candy bar inside with One Spot fast food theme favors:  a 6 color click fast food printed jumbo pens, old school hot dog crayon where you take a color tip–push it through the bottom and the next color pops up, and hot dog and pizza flashlight necklaces.  Secretly, I like playing with all of these things.

Here is my fireplace decorated with hanging ketchup bottles and the burlap and tissue garland I used for Mendel’s 1st birthday:  Growing Like A Weed party.  The oversized french fry carton is a 2 dollar trashcan I spray painted red and filled with cut mini yellow pool noodles.  I attached a number 3 and all of my dreams came true.  Tip:  pool noodles cut super easy with a large serrated bread knife.

MENU

Sweet Potato fries (that didn’t quite make it)

Steak fries and ketchup

AND THE BEST….

Sugar cookie fries with Nutella dip

I took 2 rolls of sugar cookie dough, rolled it flat, baked it, and sliced it into fries with a serrated knife.  SOOO cute, theme appropriate and fun!  Who doesn’t like Nutella?  If you don’t, we can’t talk to each other anymore. The baskets, checkered liners, and condiment cups all came from Mighty Dollar.  Mighty Dollar is so stinkin’ mighty.


If you don’t like Nutella, you can at least make it up to me by fully loving and appreciating this shirt.  It’s a kid’s shirt. With a ketchup bottle.  At a ketchup french fry party.  Seriously.

I get shirts like this and this one from my daughter’s Diaversary Party (type 1 diabetes diagnosis anniversary), from Zazzle.  You can find, customize and create anything under the sun on this site.  I’ve used them for shirts, to stickers, to business cards, to your mom.

I had a BLAST doing this party!  I did the whole thing for 30 people for 125 dollars.  It may have been less but I’m erring on the safe side.  Pin, share and enjoy all of the her party pants goodness!  Until next time, players….

Unicorns and Rainbows Party

2nd May 2017


So every year I have tried to have a party at the in-laws horse farm…it rains.  I tried to have one there on my eldest’s daughter’s first birthday and then again on the 7th.  Both parties were cold and rainy.  I had some BIG plans for a unicorn party at a horse farm.  All in all, it turned out cute either way.  Plus, I felt a little like jumping a plane and heading out of the country with my original plans anyways so, all’s well that ends well!

When you see this cake…do your bones light up with magic?  If I could take this cake to bed to look at it every night, I would.  Believe it or not, this is not a hard cake to make!  Okay, so the fondant horn and ears maybe, but you can buy these on Etsy and add it to a cake you did all the icing work for.  Icing swirling a bag is easy peasy and then, it is just simple, simple rosettes.  I believe in you!

Tall birthday candles for the win!  Target…you are my hero.  You always are…

Next up, face painting!  Hire a friend or artsy college student like I did and it will be good money for them, but savings for you!  I snagged and printed some unicorn and rainbow face paintings from Pinterest, printed them out and let the kids choose.


Now is where the big plans came in and got smaller real fast, y’all.  BUT, it was still magical!  I made this horn/flower headpiece and fitted it on our mini horse.  The fact the HE, yep, a dude horse, is mini, made it even more magical.  The fact that when they came to the barn, they didn’t know a “unicorn” would be there?  Even better! Every guest took a picture with the birthday girl and the unicorn…boy…the unicorn boy.

The DIY unicorn horn I made below took only about 15 minutes.  I didn’t follow any plans.  I just went to Hobby Lobby and looked for anything horn-like.  I settled on a Styrofoam cone that I shaved down with a bread knife.  I wrapped it in 2 white felt sheets, added fake flowers to the bottom, and wrapped the finished horn in a skinny gold ribbon from the trim aisle.  I added two sturdy wide cotton ribbon to the underside at 12 and 6 o’clock.  Those straps were used to tie the horn to the bridle of the horse so that nothing was attached to the actual horse.  I used hot glue to make this whole horn which is perfect because hot glue has the power of 20 marines.

For one of the party activities we did sand art!  Why is this awesome 80’s/90’s craft forgotten??!! Kids LOVE to do this!  It isn’t near as messy as you think and the kids have a blast doing it.  It’s colorful, creative, and something the children have either NEVER done or haven’t done in a while.  It’s an activity AND a favor!  Double duty party details are MY FAVORITE! JUST LIKE USING CAPS OVER AND OVER AGAIN IN THIS PARAGRAPH!  Hobby Lobby has all you need to make your sandy dreams come true!

Pin, share, enjoy!!!!


DIY Candy Necklace Bar

12th April 2017


I threw my first birthday party for one of my children where activities were 100 percent of the entertainment.  In the past they have wanted inflatables etc., and with those, you don’t fill the time.  You just let those puppies run!  I was nervous to do an all activities party because I didn’t know how many activities I would need or how long each would last with a bunch of 4-ish year-olds.  I pictured flying through everything and then all of the kids just sitting there staring at each other and their parent’s staring at me and I’m naked!  No wait, that is the nightmare I had about it the night before.  I did wear clothes and successfully left them on.

This simple activity was what dreams are made of and how cavities come to be:  DIY Candy Necklace Bar.  They can wear them, eat them, or take them home as a super unique and easy favor they made themselves.

I bought different colored string and used Fruit Loops and several different types of Life Savers (gummy, orange mint, etc.)  I also tried to use one inch cut pieces of Twizzlers, but the holes were not big and circular enough.  Note to yourself:  If you do this activity, use Red Vines instead.  I think those would work much easier!

How cute and fun was this?!?!  It’s affordable and not something you have likely done at a party before!  Pin, share, enjoy and follow all of my party pants, right here…right now, y’all.

Photography Credit:  Shelly Griffin Photography